How to Create Pinterest Idea Pins: All social media platforms are using different methods to attract their users. Pinterest Idea Pins are also one of these ways that give a good experience to its users.
Also, most of the social media platforms are giving more importance to video contents. The length of these video contents ranges from a few seconds to minutes.
Pinterest also launched Story Pin in September 2020 to give more good experiences to its users. But these Story Pins were visible only for 24 hours.
Pinterest changed the name of Story Pins to Pinterest Idea Pins in May 2021 and also added many important features to it. The special thing about Pinterest Idea Pins is that they do not disappear after 24 hours and last forever.
Since it is not a long time since the launch of Pinterest Idea Pins, most of the users of Pinterest are not well aware of it. If you are also confused about Pinterest Idea Pins, then you are going to get detailed information about it through this article.
For this you must read this article completely. So, let’s know how to create Pinterest Idea Pins and important features of Idea Pins.
But first we will know what are the Pinterest Idea Pins?
Also read:

What are Pinterest Secret Boards and how to Make Boards Secret on Pinterest

Differences Between Pinterest Business Account and Personal Account
What are Pinterest Idea Pins?

We can say that the updated version of Story Pin is Pinterest Idea Pins. Both of them have the same theme and that is to put some video clips or images or text in a single pin.
But where Story Pins used to last only for 24 hours, Pinterest Idea Pins once uploaded will remain in your Pinterest account forever.
A Pinterest Idea Pin has 20 pages and you can insert video clips or images or write text in these Pins.
If you only put video clips in a Pinterest Idea Pin, the length of each video clip will be a maximum of 60 seconds. This means you can insert 20 video clips and the length of each will be maximum 60 seconds.
Your Pinterest Idea Pins can also be saved by any Pinterest user in their account.
Like Instagram Story, Pinterest Idea Pins also appear at the top of your Pinterest feed.
This gives you the advantage that the chances of Pinterest users clicking on the Idea Pin are increased compared to the standard Pin. So, by using Pinterest Idea Pins the engagement of Pinterest users with you also increases.
But keep in mind that you must have a Pinterest Business Account to create Pinterest Idea Pins. You cannot create it in Personal Account.
How to Create Pinterest Idea Pins?
Here we are going to give information about how to make Pinterest Idea Pin in both android mobile app and website.
Creating Idea Pin using Pinterest Website
Step-1– Open Pinterest website in browser and login to your Pinterest account. Keep in mind that the Pinterest account should be a business account.
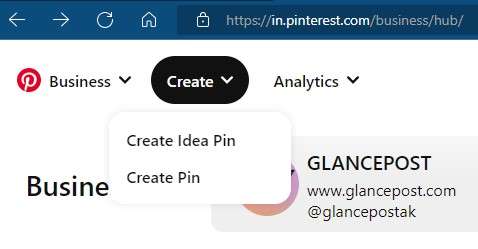
Step-2 – After login to the Pinterest Business Account, three menus appear in the top left corner on both your home feed or profile page.

Step-3– Click on Create menu from these and then click on Create Idea Pin.
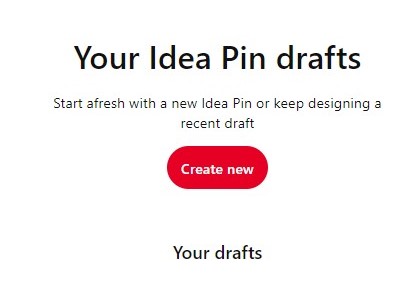
On the next page you will see two options. One is Create new and the other is Your drafts.
Your drafts shows the Idea Pins which you have not created completely and are yet to be published.
Since you are going to create an Idea Pin for the first time, nothing will appear under Your drafts and will be completely blank.
Step-4– Therefore to create a new Idea Pin, click on the option of Create new given on this page.
On clicking Create new, another window will open where you can upload up to 20 image or video clips.
Step-5– To upload you can drag and drop the image or video or click anywhere on that window.
After clicking, you can select and upload the images and videos stored in the disc of your computer.
Step-6– As soon as you upload the images or videos, the next window of Design your pages opens.
In this window there are some options on the left side, such as Duplicate page, Delete page and New page. Apart from this, the images and videos uploaded by you also appear here.
Similarly, three options are available on the right side of the window – Image, Text and Background.
In the first option i.e. Image, you can flip the uploaded image vertically i.e. top to bottom and horizontally i.e. left to right.
Using the second option, you can write something on the image. You get four more options for writing text – Font, Alignment, Color and Highlight.
They allow you to change the font of text, position them on the left or center of the image, change their color, and highlight them.
The third option is Background. It can change the background color of the uploaded image.
After designing the page, click on the button of Next given in the bottom right corner.
Step-7– In the next window, you have to enter some basic information about Idea Pin. Like writing the title of the Idea Pin to be created.
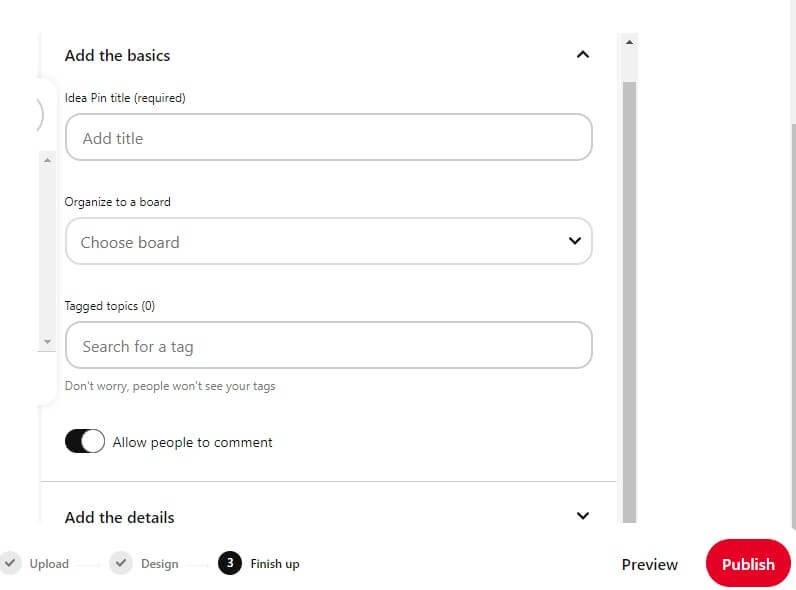
You have to choose the board in which you want to put this Idea Pin. If you have not already created a board, then here the option of Create board is available. You can enter this Idea Pin by becoming a new board.
In the third box you can tag the topic. This is optional. If you want to tag any topic then you can search for it by typing it in the given box.
Its special thing is that no user can see the topic tagged by you.
After filling the basic details, you can give some more details as per the requirement in the Add a list section.
This section has three options – Ingredients, Supplies and Notes
For example, suppose you are making an Idea Pin related to a recipe, then in the option of Ingredients, you can tell about the ingredients used in that recipe.
Step-8– When your Idea Pin is completely ready, then on the same window click on the Publish button given in the bottom right corner.
Once published, your Idea Pin will go live and users will be able to view it.
Creating Idea Pin in Android Phone App:
Step-1- Login to the Pinterest app on your phone.
Step-2- After login, tap on the plus icon which appears at the bottom of the screen.
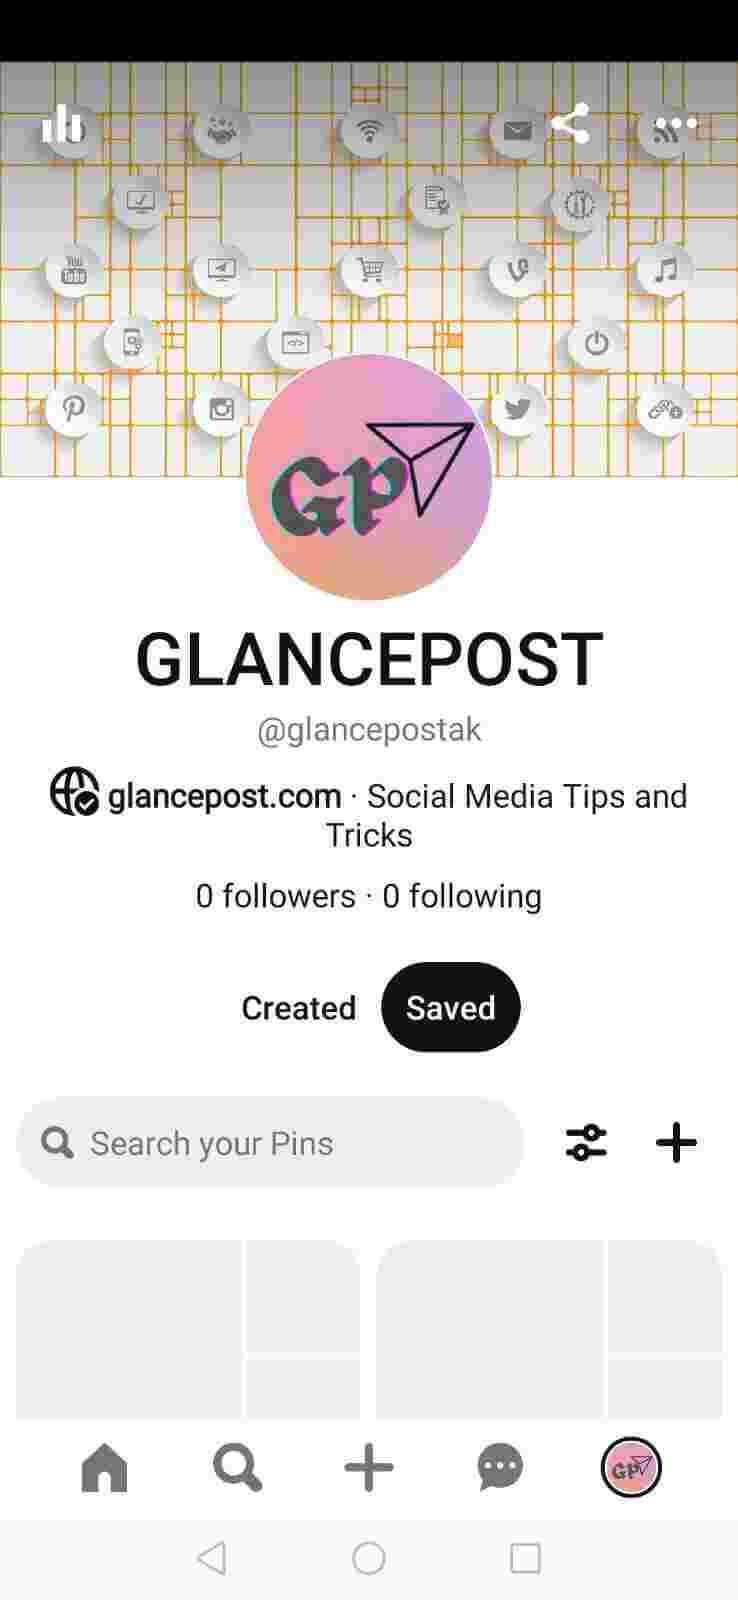
Step-3- Now you will get three options. From these, tap on the option of Idea Pin.
Step-4- On tapping the video recording page will open. If you’re asked to record and upload a video immediately, tap on the red circle at the bottom.
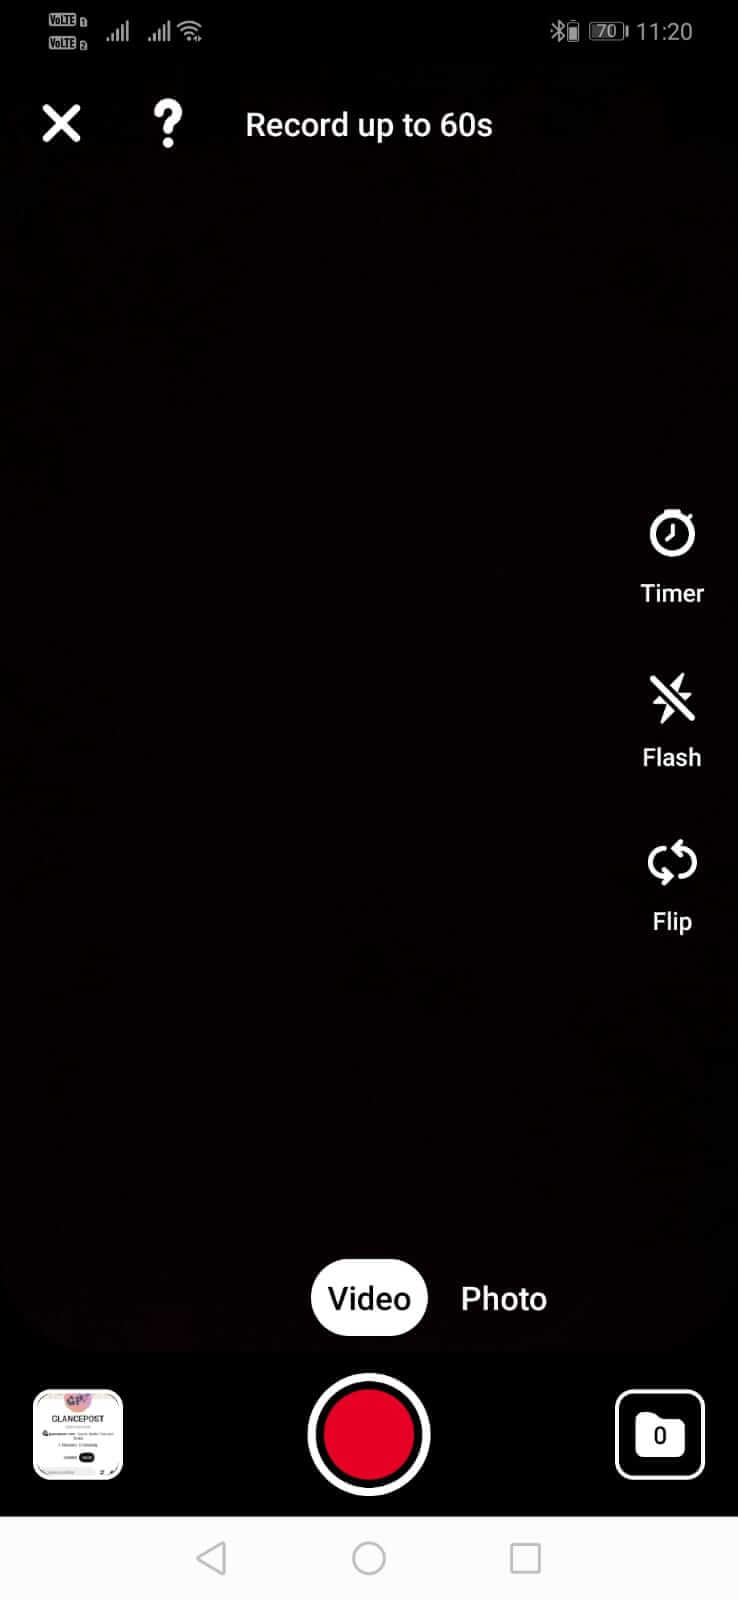
If you want to upload videos or photos saved in your phone memory, then tap on the square button on the left side of that red circle.
Step-5- After tapping, a list of saved videos and photos will appear in your phone. Tap on whichever of these you want to upload.
Here you can select multiple photos at once (up to 20).
Step-6- After selecting the photo, tap on the Next button given in the top right corner of the screen.
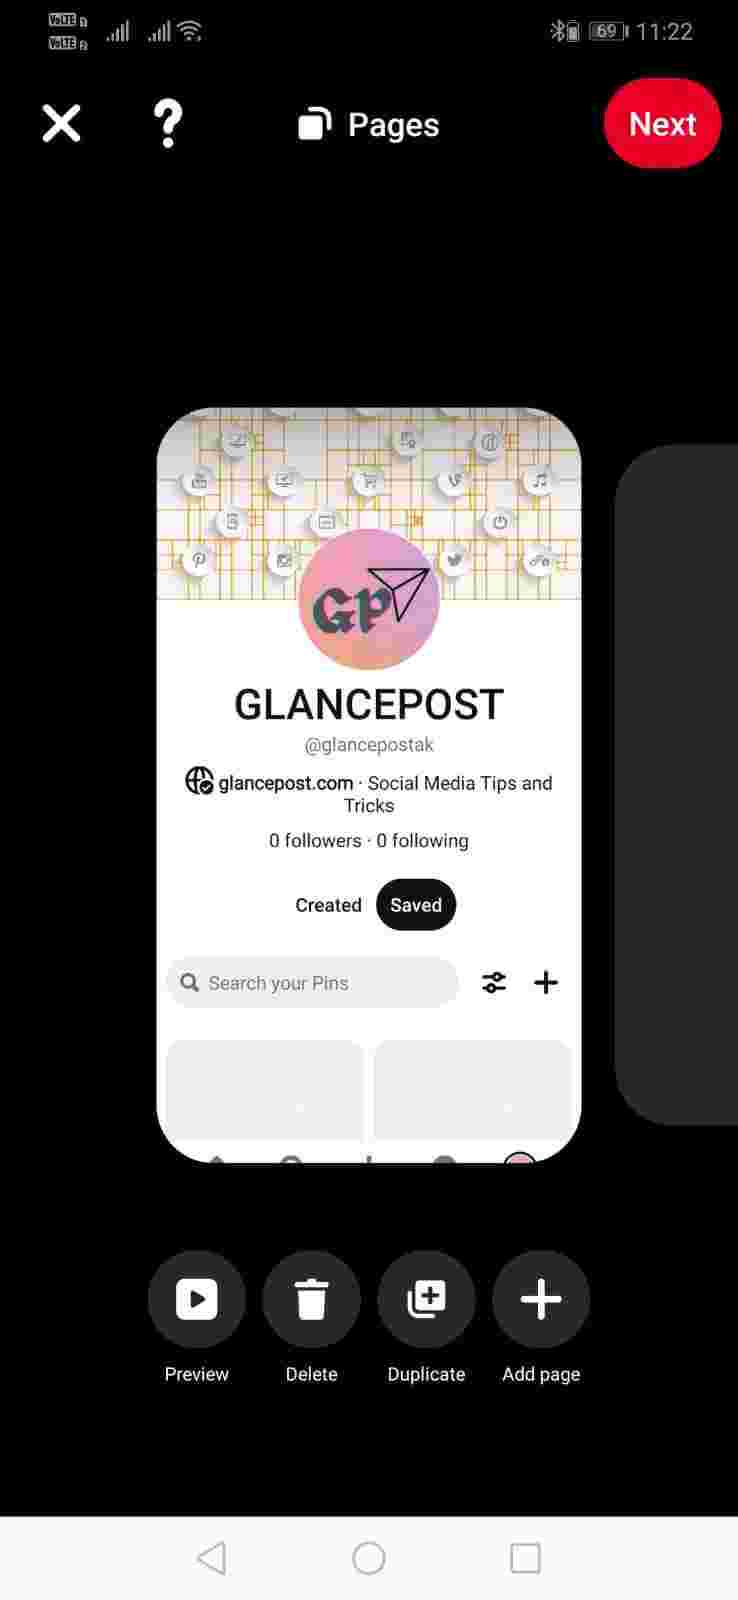
Step-7- Now your pages appear on the page that will open and there are some options below them.
Here you can see a preview of your Idea Pin before publishing it.
If you want to change the order of your pages, then use the Reorder option.
If you tap on a page, it enlarges and a few more options open below it.
Using them you can change the color of this page, write something on the top of the page and add stickers too.
After completely preparing the page, tap on the Done button given in the top right corner.
Step-8- After preparing all the pages, click on the button of Next.
Step-9- Here you have to do the same things which are mentioned in step-7 above in the Pinterest website.
Step-10- After completely creating the Idea Pin and filling the required details, tap on the Publish button given in the lower right corner.
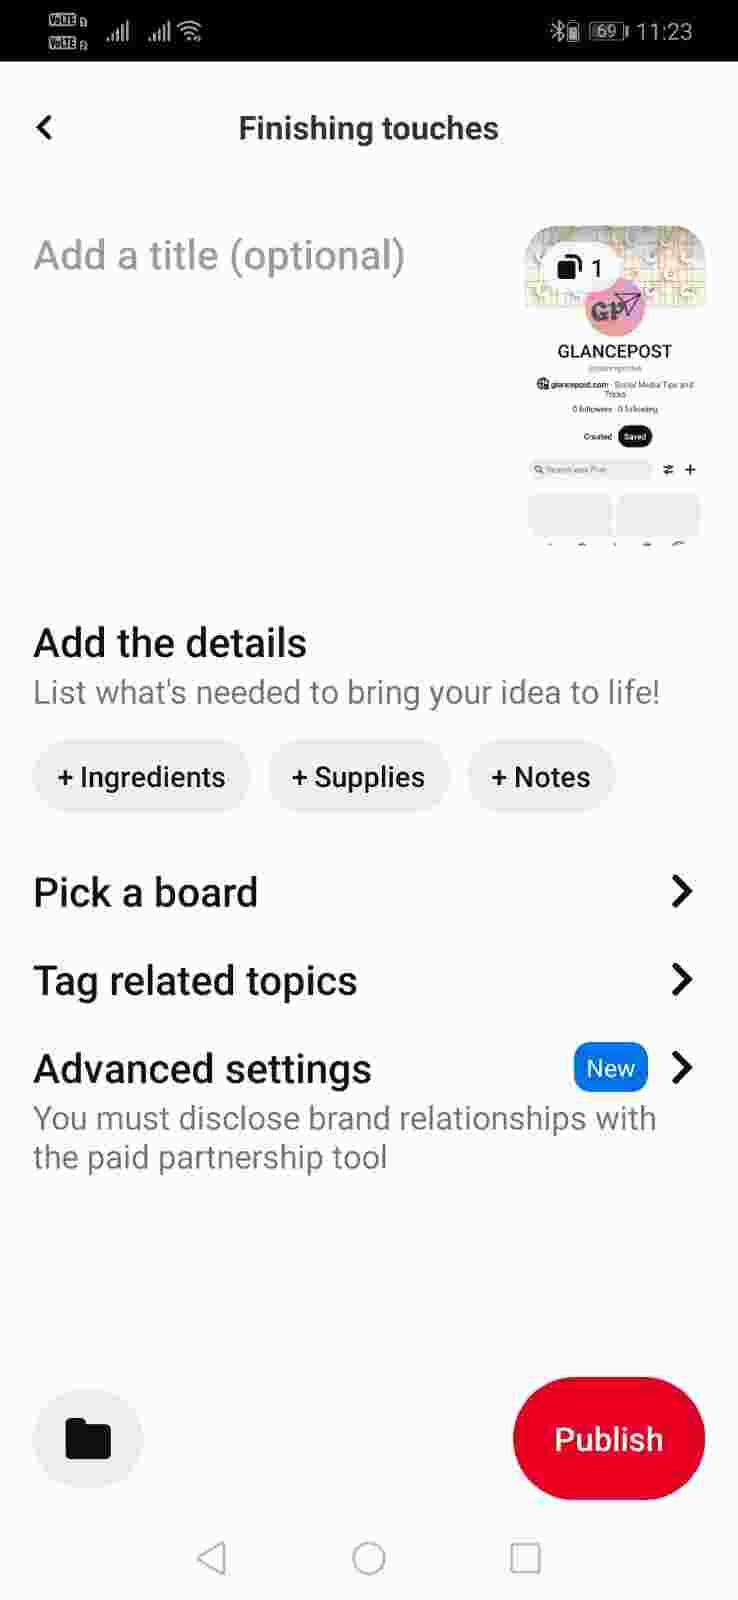
In this way your Idea Pin will go live and users can now see it.
After publishing a confirmation message will also appear. If you want to see a preview of your Idea Pin, then you can see it from here.
Important Features of Pinterest Idea Pins
There are many such important features in Pinterest Idea Pins by which you can make your Pins even more attractive and useful, and obviously more and more Pinterest users will click on your Pinterest Idea Pins.
The following important features are given in Pinterest Idea Pins-
1. Video clips, images and text can be inserted in all three formats in Pinterest Idea Pins.

2. If you want to promote a product through Pinterest Idea Pins, then you can tag it in Pinterest Idea Pins. When a user taps or clicks on that Idea Pin, he will get more information about your product. Also, you can add a link to buy that product.

3. Also voice over can be added to Pinterest Idea Pins. If you want to give your voice, then you can add to Idea Pins through Voice Over. Background music can also be given in Pinterest Idea Pins.

4. With Idea Pins, Pinterest users can be tagged, and stickers can be added to them.

5. Pinterest Idea Pins, once created, remain in your account forever and can be found at any time.

6. There is an option to export Pinterest Idea Pins and save to your PC or mobile phone. So, you can share them through other apps besides Pinterest.
By using the above features of, you can put more content in Idea Pins as compared to Regular Pins.
In addition to video, images and text in Pinterest Idea Pins, you can appeal to your audience by voice over, so that they can engage with you even more.
For example, suppose you are providing an online course related to digital marketing, then you can create Pinterest Idea Pins like this-
i) first page- you can give the title of your course
ii) second page - you can give some information related to that course
iii) third page - you can tell why people should buy your course
iv) Last page - you can give your contact details etc.
If you use Regular Pins then you have to add all these things to a single image and the users will not be able to understand clearly anything.
It is necessary to have a Business Account to create Idea Pins
If you want to create Idea Pins then you must have a Pinterest Business Account. There is no option to create Idea Pins in Pinterest Personal Account.
Obviously, a business account is necessary since you want to create Pinterest Idea Pins for your business.
You can also see the performance of your Idea Pins using Analytics, an important feature given in Business Account.
By using Analytics, you can see engagement of audience with your Idea Pins i.e. how many users click on your Idea Pins. You can also see that how many users saved your Idea Pins and how many users write comments or give reactions on your Idea Pins.
So, by using Analytics you can know the performance of your Idea Pins and if any Idea Pin are not performing well then you can improve SEO of that Idea Pin accordingly.
How to share Pinterest Idea Pins
We have already mentioned above that Pinterest Idea Pins can be downloaded and you can easily share these Idea Pins on other social media channels.
The special feature of Idea Pins is that when you share them on other social media platforms then watermarks and the name of the creator also appear on Pins.
So, if a user see your Idea Pins then he can easily know the name of the creator of Idea Pins and if he likes your Idea Pins then he may also become your follower.
File size and type of Pinterest Idea Pins
Aspect ratio: According to Pinterest, the best ratio of width and height of Idea Pins is 9:16.
But it is not necessary that this ratio should always be the same. There is no problem if a user keeps the height and width of Idea Pins in different ratio. But above-mentioned ratio by Pinterest is good for SEO purpose.
File size: Pinterest recommends that the file size for Android and iOS mobile phones should be 1GB, while for the web version the image size should be a maximum of 20 MB and 100 MB for the video.
File Type: Pinterest Idea Pin supports most of the image and video formats. You can make images in .BMP (bitmap image), .JPEG, .PNG, .TIFF (Tagged Image File Format), .WEBP formats. You can use video in .MP4, M4V, .MOV formats for creating Idea Pins.
Resolution: Pinterest recommends that if the video or image has a resolution of 1080×1920 pixels, then it looks and looks good on full screen.
But this resolution of video and image is only recommended. Users can also change it as per their convenience.
Video Length: As you know that Idea Pins can put video clips which should be at least 3 seconds in length and maximum 60 seconds.
How to save Idea Pin in Draft
Sometimes it happens that you have created an Idea Pin but do not want to publish it immediately, then you can save a draft of it and then publish it later.
If you are creating Idea Pin on Pinterest website in web browser and want to save it as Draft then no option is given anywhere.
For this, click on the icon of the cross given in the top left corner on the window that creates the Idea Pin.
After that your Idea Pin gets saved as draft.
There is an option to save Idea Pin in draft in the Pinterest app of Android mobile phone.
When you have uploaded the image or video to make Idea Pin, there is no option to save the draft on the next page.
Here also you have to save the draft by tapping on the cross icon given in the top left corner.
But if you are on another page, where you have to fill the Idea Pin title and other required details, there is an icon of a folder in the bottom left corner of that page.
You can save the Idea Pin as a draft by tapping on the icon in this folder.
How to Edit or Delete Idea Pin
After you publish Idea Pins, there are very few options to edit them again. That is, you cannot change all of their options.
The following two types of editing can be done in the published Idea Pin-
You can make changes in the board or section in which the Idea Pin has been published. That is, you can publish the Idea Pin in any other board or section.
When the Idea Pin is published, the comment option is turned off by default. You can enable it by editing the Idea Pin.
You can turn it off again if needed in future.
To edit Idea Pins, follow the steps given below-
Step-1– Click on your profile picture to see your Published Idea Pins. With this all your Idea Pins and regular pins will be visible.
Step-2– Now open the Idea Pin in which you want to edit by clicking on it.
Step-3– After opening, there are some options on the right side of that Idea Pin and three horizontal dots appear right near it. Click on these dots.
Step-4– Now click on Edit pin.
Step-5– On the next page you can see that the first option is of Board.
By clicking on the drop down arrow of this option, you can select the board or else you can also create a new board.
Similarly, in the second option section, you can select the section by clicking on the drop down arrow.
If you want to write some notes in the third option Note to self, then you can write. This is optional and can be used only for your convenience.
Through the fourth option, you can turn comments on or off.
Step-6- After making all the necessary editing, click on the save button given in the lower right corner.
In this way you can edit Idea Pin.
If you want to delete your Idea Pin, then on the same editing page click on the Delete button given in the bottom left corner.
Can Idea Pin be used for traffic on the blog?
This is a big problem for bloggers who want to drive traffic to their blog through Idea Pins.
Because no link can be added to Idea Pins. That’s why you can’t even give a link to your blog.
Yes, you can give the url of your blog after giving brief information about your blog, but that will be only text and not a clickable link.
From here a user can go to your website by typing the url of your blog in the browser, but can not go directly by clicking.
That’s why using Idea Pins to bring traffic to the blog is not that good.
Regular Pins are more suitable for traffic on the blog. Idea Pins definitely have this advantage that through them you can increase your Pinterest followers.
If your followers increase then most likely they will want to see your regular Pins too.
Then there is a possibility of traffic coming to your website through Regular Pins. But this is the only possibility, so we do not recommend that you spend much of your time creating Idea Pins.
Still, if you want to experience Idea Pins, then definitely try it once.
Conclusion
In this article, we have explained what Pinterest Idea Pins are and what are the important features of Pinterest Idea Pins.
Step-by-step information is also given for making Idea Pins.
But should you use Idea Pins?
Since most of the Pinterest users use this social media platform to bring traffic to their blog or website.
But you cannot add a link to your blog or website in these, so they are not as beneficial for bloggers.
Yes, if you want to promote any of your products, then you can use Idea Pins.
Their best use is when they want to give some information step-by-step or tell about a recipe or tell about a DIY.
Still, you must try them once.
How did you like this article, do tell about it in the comment box and don’t forget to share.
FAQs
What is an Idea Pin?
An Idea Pin is a type of Pin on Pinterest that allows users to save and organize ideas for their future projects or activities. Idea Pins can be saved to boards and can include images, videos, and written descriptions to help users remember and plan for their ideas.
Can I edit an Idea Pin after I create it?
Yes, you can edit an Idea Pin after it has been created.
Can I delete an Idea Pin?
Yes, you can delete an Idea Pin if you no longer want it on your Pinterest account.
Can I add a link to an Idea Pin?
No, you cannot add link to Idea Pins. That’s why you can’t even give a link to your blog. But you can write the URL of your blog after giving brief information about your blog, but that will be only text and not a clickable link.
Can I share an Idea Pin with other Pinterest users?
Yes, you can share an Idea Pin with other Pinterest users by sending them the link to the Pin.
Can I organize my Idea Pins into categories?
Yes, you can organize your Idea Pins into categories by creating different boards for different types of ideas. For example, you could create a board for home improvement ideas, a board for recipes, and a board for travel ideas.
Can I collaborate with other Pinterest users on an Idea Pin
Yes, you can collaborate with other Pinterest users on an Idea Pin by inviting them to contribute to a shared board.